Friday, October 17, 2008

How to rename the Recycle Bin in Windows?

Not many of us know on how to rename the "Recycle Bin" in Windows Xp. Lucky for you, I've found a way to rename it after surfing and googling on the Net. All you have to so is to edit the registry value.

Here's how to do it:-

  • Go to Start >> Run
  • Type regedit.exe and hit enter and it will open the Registry Editor.
  • Navigate to HKEY_CURRENT_USER\Software\Microsoft\Windows\ ShellNoRoam\MUICache
  • You’ll find probably something like this: @C:\WINDOWS\system32\SHELL32.dll,-8964.


  • Change it’s value to what you want the Recycle Bin’s name to be. Like "Recycle Bin" to "BIN".


Note: Modifying the Registry may harm your system if you're changing the wrong settingss. Make sure you have a backup. Do it at your own risk.

How To Set Portable Antivirus Automatic Detect Removable Drive and Scan It ?

By having this settings, your computer is somehow safe from the virus that infected your removable drive from entering your computer system.

First of all,you have to download Portable Antivirus.


Then open up Portable Antivirus configuration settings. Under "Scanning Options", checked "automatic detect removable drive when user plugged-in".


Done. So, everytime you plugg-in any removable drive you will get a message just like the picture below :-


Correct me if I'm wrong, but I do not see other anti-virus have the settings to automatic detect removable drive and scan. If you're using other antivirus,when you plugg-in any USB drive just simply right-click on the USB Drive and choose "Scan with..." option to scan.

It is a best practice to always scan your removable drive before open and explore the files inside.

How To Reveal Hidden Password of Messengers

MOst of you already know that usually the username of any program can be viewed clearly but the password is hidden the asterisks symbol.BUT, do you know that even the password is hidden, you still can view it since there is software that is able to do it.

It's called Snadboys' Revelation. Snadboys' Revelation is a free utility that can be used to reveal passwords which are behind the asterisks. All you have to do is run the software and drag the crosshair to the password field. The password will then be visible in the English form.

For example, I'm using it to reveal Yahoo Messenger password to test whether it work or not.

Install the program and run it.Drag the crosshair cursor to the asterisks part.Voila, the password will be revealed. (Status : Green light, Revelation active)

In this example, the password is : hideme

Get rid of “The system has recovered from a serious error” Message

Get rid of “The system has recovered from a serious error” message

Sometimes when there is some problem with your computer, Windows either forces you to restart or automatically reboots. Upon restart it displays the message “The system has recovered from a serious error“.


Now, typically this message should be displayed only once. But sometimes it so happens that once you get the message, then everytime you restart the message keeps popping up, even when you reboot manually. While it doesn’t take more than a click to do away with the message each time, it is a real annoyance. Windows will keep prompting you to send the error to Microsoft after every reboot.

But thankfully there is a way to get rid of the annoying message.

  • Right-click on the My Computer icon on the desktop and select Properties.
  • Select the Advanced tab and click Settings in the Performance area.
  • Performance Option > Advanced. In the Virtual Memory area click Change. Under Paging file size for select drive, click No paging file and click Set.
  • You will see two warnings. Just click Yes on both of them and then select the System managed size option. Close all the dialog boxes and reboot.

Display the Contents of Moving Windows (All Windows)

When enabled, this setting will cause Windows to display the current contents of a window while it is being dragged around the screen instead of just displaying the window outline.

Open your registry and find the key below.

Create a new string value named 'DragFullWindows', or modify the existing value, to equal '1' for enabled, or '0' for disabled.

Restart Windows for the change to take effect.

Registry Settings
User Key: [HKEY_CURRENT_USER\Control Panel\Desktop]
Value Name: DragFullWindows
Data Type: REG_SZ (String Value)
Value Data: (0=disable, 1=enable)

Disclaimer: Modifying the registry can cause serious problems that may require you to reinstall your operating system. We cannot guarantee that problems resulting from modifications to the registry can be solved. Use the information provided at your own risk.


Disable Auto Upgrade with Windows Media Player (All Windows)

When Windows Media Player is used it will periodically check for newer versions via the Internet. This tweak allows you to turn off this checking and notification.
Windows Media Player 7.0, 7.1 and Media Player for Windows XP (8.0)
Open your registry and find or create the key [HKEY_LOCAL_MACHINE\SOFTWARE\Policies\Microsoft\WindowsMediaPlayer]. Create a new DWORD value called "DisableAutoUpdate" and set it to "1" to disable updates.

Windows Media Player 6.4
Open your registry and find or create the key [HKEY_LOCAL_MACHINE\SOFTWARE\Microsoft\MediaPlayer]. Create a new string value called "EnableAutoUpgrade" and set it to "No" to disable updates.

Restart Windows Media Player for the changes to take effect.

Note: This tweak affects Windows Media Player 6.4, 7.0, 7.1 and Media Player for Windows XP (8.0).

Registry Settings
System Key: [HKEY_LOCAL_MACHINE\SOFTWARE\Policies\Microsoft\WindowsMediaPlayer]
Value Name: DisableAutoUpdate, EnableAutoUpgrade

Disclaimer: Modifying the registry can cause serious problems that may require you to reinstall your operating system. We cannot guarantee that problems resulting from modifications to the registry can be solved. Use the information provided at your own risk.

Change the Title of Windows Media Player (All Windows)

This tweak allows you to customize the title bar text shown on Windows Media Player.
Open your registry and find the key below.

Create a new string value called "TitleBar" and set it to the text you would like display in the title.

Restart Media Player for the change the take effect.


Registry Settings
User Key: [HKEY_CURRENT_USER\Software\Policies\Microsoft\WindowsMediaPlayer]
System Key: [HKEY_LOCAL_MACHINE\Software\Policies\Microsoft\WindowsMediaPlayer]
Value Name: TitleBar
Data Type: REG_SZ (String Value)

Disclaimer: Modifying the registry can cause serious problems that may require you to reinstall your operating system. We cannot guarantee that problems resulting from modifications to the registry can be solved. Use the information provided at your own risk.

Clear the Recent Play List in Media Player (All Windows)

This tweak allows you to clear the recent files, URL history and radio stations in Windows Media Player.
Open your registry and find the key below.

To remove content that has been streamed from a particular Web site, clear the [...\RecentURLList] sub-key.

To remove the entire file list that you recently played, clear the [...\RecentFileList] sub-key.

To remove entries from the radio toolbar clear the [HKEY_CURRENT_USER\Software\Microsoft\MediaPlayer\Radio\MRUList] key.

Restart Windows Media Player for the change to take effect.

Registry Settings
User Key: [HKEY_CURRENT_USER\Software\Microsoft\MediaPlayer\Player]

Disclaimer: Modifying the registry can cause serious problems that may require you to reinstall your operating system. We cannot guarantee that problems resulting from modifications to the registry can be solved. Use the information provided at your own risk.

Disable Desktop Cleanup Wizard (Windows XP)

By default Windows will run the Desktop Cleanup Wizard every 60 days to remove unused desktop items and shortcuts. This setting will disable it from running automatically.

Open your registry and find or create the key below.

Create a new DWORD value, or modify the existing value, called "NoRun" and set it according to the value data below.

Exit your registry, you may need to restart or log out of Windows for the change to take effect.

Registry Settings
User Key: [HKEY_CURRENT_USER\Software\Microsoft\Windows\CurrentVersion\Explorer\
Desktop\CleanupWiz]
Value Name: NoRun
Data Type: REG_DWORD (DWORD Value)
Value Data: (0 = enabled, 1= disable wizard)

Disclaimer: Modifying the registry can cause serious problems that may require you to reinstall your operating system. We cannot guarantee that problems resulting from modifications to the registry can be solved. Use the information provided at your own risk.

Disable Password Caching (All Windows)

Normally Windows caches a copy of the users password on the local system to allow for additional automation, this leads to a possible security threat on some systems. Disabling caching means the users passwords are not cached locally. This setting also removes the second Windows password screen and also remove the possibility of networks passwords to get out of sync.


Open your registry and find or create the key below.

Create a new DWORD value, or modify the existing value, called "DisablePwdCaching" and set it according to the value data below.

Exit your registry, you may need to restart or log out of Windows for the change to take effect.


Registry Settings
User Key: [HKEY_CURRENT_USER\Software\Microsoft\Windows\CurrentVersion\Policies\
Network]
System Key: [HKEY_LOCAL_MACHINE\Software\Microsoft\Windows\CurrentVersion\Policies\
Network]
Value Name: DisablePwdCaching
Data Type: REG_DWORD (DWORD Value)
Value Data: (0 = disabled, 1=enabled)

Disclaimer: Modifying the registry can cause serious problems that may require you to reinstall your operating system. We cannot guarantee that problems resulting from modifications to the registry can be solved. Use the information provided at your own risk.

Enable Shutdown Event Tracker (Windows XP)

The Shutdown Event Tracker provides a simple and standard mechanism you can use to consistently document the reasons for shutting down or restarting your computer. The information provided is recorded in the system log in Event Viewer.
Open your registry and find the key below.

Create a new DWORD value or modify the existing value named "ShutdownReasonUI" and set it to "1" to enable shutdown event tracking.

When enabled an additional drop-down option box will be displayed with various planned and unplanned shutdown reasons.

Restart Windows for the change to take effect.

Registry Settings
System Key: [HKEY_LOCAL_MACHINE\SOFTWARE\Microsoft\Windows\CurrentVersion\Reliability]
Value Name: ShutdownReasonUI
Data Type: REG_DWORD (DWORD Value)
Value Data: (0 = default, 1 = enabled)

Disclaimer: Modifying the registry can cause serious problems that may require you to reinstall your operating system. We cannot guarantee that problems resulting from modifications to the registry can be solved. Use the information provided at your own risk.

Disable Recent Files in Media Player (All Windows)

This restriction will stop Windows Media Player from storing the names of the played media in the recent file list.

Open your registry and find or create the key below.

Create a new Binary value, or modify the existing value, called "AddToMRU" and set it according to the value data below.

Exit your registry, you may need to restart or log out of Windows for the change to take effect.

Note: This setting only effects Windows Media Player 8.0 or greater.


Registry Settings
User Key: [HKEY_CURRENT_USER\Software\Microsoft\MediaPlayer\Preferences]
Value Name: AddToMRU
Data Type: REG_BINARY (Binary Value)
Value Data: 00 = disabled, 01 = enabled

Disclaimer: Modifying the registry can cause serious problems that may require you to reinstall your operating system. We cannot guarantee that problems resulting from modifications to the registry can be solved. Use the information provided at your own risk.

Rename or Delete Special Folders (All Windows)

This setting allows you to rename and delete special folders (such as the Recycle Bin) as if it was a normal folder by right-clicking the icon.
Open your registry and find the key below, where GUID is the identifier for the special folder.

DescriptionGlobally Unique Identifier (GUID)
Administrative Tools{D20EA4E1-3957-11d2-A40B-0C5020524153}
Briefcase{85BBD92O-42A0-1O69-A2E4-08002B30309D}
Control Panel{21EC2O2O-3AEA-1O69-A2DD-08002b30309d}
Fonts{D20EA4E1-3957-11d2-A40B-0C5020524152}
History{FF393560-C2A7-11CF-BFF4-444553540000}
Inbox{00020D75-0000-0000-C000-000000000046}
Microsoft Network{00028B00-0000-0000-C000-000000000046}
My Computer{20D04FE0-3AEA-1069-A2D8-08002B30309D}
My Documents{450D8FBA-AD25-11D0-98A8-0800361B1103}
My Network Places{208D2C60-3AEA-1069-A2D7-08002B30309D}
Network Computers{1f4de370-d627-11d1-ba4f-00a0c91eedba}
Network Connections{7007ACC7-3202-11D1-AAD2-00805FC1270E}
Printers and Faxes{2227A280-3AEA-1069-A2DE-08002B30309D}
Programs Folder{7be9d83c-a729-4d97-b5a7-1b7313c39e0a}
Recycle Bin{645FF040-5081-101B-9F08-00AA002F954E}
Scanners and Cameras{E211B736-43FD-11D1-9EFB-0000F8757FCD}
Scheduled Tasks{D6277990-4C6A-11CF-8D87-00AA0060F5BF}
Start Menu Folder{48e7caab-b918-4e58-a94d-505519c795dc}
Temporary Internet Files{7BD29E00-76C1-11CF-9DD0-00A0C9034933}
Web Folders{BDEADF00-C265-11d0-BCED-00A0C90AB50F}

To change the features shown on the context menu, edit the value of "Attributes" and set it to one of the values below, the default value is "40 01 00 20".

File Features

  • 50 01 00 20 - Rename
  • 60 01 00 20 - Delete
  • 70 01 00 20 - Rename and Delete

    Edit Features

  • 41 01 00 20 - Copy
  • 42 01 00 20 - Cut
  • 43 01 00 20 - Copy and Cut
  • 44 01 00 20 - Paste
  • 45 01 00 20 - Copy and Pase
  • 46 01 00 20 - Cut and Copy
  • 47 01 00 20 - Cut, Copy and Paste

    For example to add the ability to Rename and Delete the Recycle Bin open [HKEY_CLASSES_ROOT\CLSID\{645FF040-5081-101B-9F08-00AA002F954E}\ShellFolder] and change the value of "Attributes" to "70 01 00 20".

    The changes should take effect immediately.

    Note: On Windows XP this tweak changes the File menu not the context menu. Access the features by right-clicking "Explore" -> "File" -> Rename or Delete. Both the Rename and Delete tweaks must be checked together before either tweak will display in Explorer.

  • Registry Settings
    System Key: [HKEY_CLASSES_ROOT\CLSID\{GUID}\ShellFolder]
    Value Name: Attributes
    Data Type: REG_BINARY (Binary Value)
    Value Data: (70 01 00 20=rename/delete, 40 01 00 20=default)

    Disclaimer: Modifying the registry can cause serious problems that may require you to reinstall your operating system. We cannot guarantee that problems resulting from modifications to the registry can be solved. Use the information provided at your own risk.

    Speed-up Access to AVI Media Files (Windows XP)

    Windows XP can run slowly when attempting to access a folder that contains a large number of AVI (Audio Video Interleave) media files. This tweak speeds the process up by stopping Windows from extracting file information from AVIs.

    Open you registry and find the key below.

    To disable file information extraction rename the key and place a minus sign infront of the current name (i.e. "-{87D62D94-71B3-4b9a-9489-5FE6850DC73E}").

    Restart Windows for the change to take effect.

    Registry Settings
    System Key: [HKEY_CLASSES_ROOT\CLSID\{87D62D94-71B3-4b9a-9489-5FE6850DC73E}]

    Disclaimer: Modifying the registry can cause serious problems that may require you to reinstall your operating system. We cannot guarantee that problems resulting from modifications to the registry can be solved. Use the information provided at your own risk.

    Change the Position of the Desktop Wallpaper (All Windows)

    Unfortunately Windows only gives you the limited options of center or tile for the placement of the desktop wallpaper. With this setting you can move the image anyway on your desktop.
    Open your registry and find the key below.

    Create two new string values of 'Wallpaperoriginx' and 'Wallpaperoriginy'. If the values already exist then you simply modify them.

    Set the value of 'Wallpaperoriginx' to equal the horizontal offset, and set the value of 'Wallpaperoriginy' to equal the vertical offset. Then either restart Windows, or change your background image through the Control Panel.

    Note: The image is offset from the center of your desktop, so you can use positive and negative values.

    Registry Settings
    User Key: [HKEY_CURRENT_USER\Control Panel\Desktop]
    Value Name: Wallpaperoriginx, Wallpaperoriginy
    Data Type: REG_SZ (String Value)
    Value Data: Distance in Pixels

    Disclaimer: Modifying the registry can cause serious problems that may require you to reinstall your operating system. We cannot guarantee that problems resulting from modifications to the registry can be solved. Use the information provided at your own risk.

    Change the Color of Encrypted Files (Windows XP)

    When a file or folder is encrypted it is normally shown using a different color in Explorer. This setting defines which color to use.
    Open your registry and find or create the key below.

    Create a new Binary value, or modify the existing value, called "AltEncryptionColor" and set it according to the value data below.

    Exit your registry, you may need to restart or log out of Windows for the change to take effect.

    Registry Settings
    User Key: [HKEY_CURRENT_USER\Software\Microsoft\Windows\CurrentVersion\Explorer]
    Value Name: AltEncryptionColor
    Data Type: REG_BINARY (Binary Value)
    Value Data: RR GG BB 00 (default = 00 80 40 00)

    Disclaimer: Modifying the registry can cause serious problems that may require you to reinstall your operating system. We cannot guarantee that problems resulting from modifications to the registry can be solved. Use the information provided at your own risk.

    Change Drive Name and Icon (All Windows)

    This tweak allows you to change the name and icon shown in Explorer for a specific drive letter.
    Open your registry and find the key below. If the key does not already exist then create it.

    Within the main key create a new sub-key with a single letter representing the drive letter of the drive to be modified. (e.g. [HKEY...\DriveIcons\D])

    Within the drive letter key create another sub-key called "DefaultIcon" (e.g. [HKEY...\DriveIcons\D\DefaultIcon]) and set the "(Default)" value to equal the fully qualified name of the icon file. If the file contains more that one icon follow it with a comma and the zero-based index of the icon (e.g. "c:\icons\myicons.dll,4").

    Create another sub-key within the drive letter key called "DefaultLabel" (e.g. [HKEY...\DriveIcons\D\DefaultLabel]) and set it's "(Default)" value to equal the label for the drive letter (e.g. "My ZIP Drive").

    For example:

    HKEY_LOCAL_MACHINE
    Software
    Microsoft
    Windows
    CurrentVersion
    Explorer
    DriveIcons
    D
    DefaultIcon
    (Default) = c:\icons\myicons.dll,4
    DefaultLabel
    (Default) = My ZIP Drive

    You may need to restart Windows for the change to take effect, or press F5 to refresh My Computer.

    Note: The "DefaultLabel" value only works with Windows 2000 and higher.

    Registry Settings
    System Key: [HKEY_LOCAL_MACHINE\SOFTWARE\Microsoft\Windows\CurrentVersion\Explorer\
    DriveIcons]
    Value Name: Default
    Data Type: REG_SZ (String Value)

    Disclaimer: Modifying the registry can cause serious problems that may require you to reinstall your operating system. We cannot guarantee that problems resulting from modifications to the registry can be solved. Use the information provided at your own risk.

    Allow Fast User Switching (Windows XP)

    Fast user switching allows you to quickly switch to another user account without having to close any programs. This setting controls whether fast user switching is available.

    Open your registry and find or create the key below.

    Create a new DWORD value, or modify the existing value, called "AllowMultipleTSSessions" and set it according to the value data below.

    Exit your registry, you may need to restart or log out of Windows for the change to take effect.

    Note: Windows XP users must use the standard Welcome Screen logon method.


    Registry Settings
    System Key: [HKEY_LOCAL_MACHINE\SOFTWARE\Microsoft\Windows NT\CurrentVersion\Winlogon]
    Value Name: AllowMultipleTSSessions
    Data Type: REG_DWORD (DWORD Value)
    Value Data: (0 = Disable Fast User Switching, 1= Enable)

    Disclaimer: Modifying the registry can cause serious problems that may require you to reinstall your operating system. We cannot guarantee that problems resulting from modifications to the registry can be solved. Use the information provided at your own risk.

    CONFIGURING THE APACHE SERVER


    1. Materials needed before you begin

    You'll need the four Fedora Core 2 CDs, a machine, an Internet connection and the IP addresses of the gateway and for the machine itself.

    2. Install Fedora Core 3

    The installation process follows the same steps as for Fedora Core 1 (and earlier versions of Red Hat) so it's not necessary to explicitly repeat each step again. If you haven't done a FC install However, since this is a Web server, the choices you make in several steps are different, and those differences are explained here.

    2.1 Installation type

    Select the “server” installation. Fine tuning of the packages will come later.

    2.2 Configure partitions

    A Web server has different partition requirements than a desktop or a file server. For a machine with 26 GB of hard disk space,spread out over two drives, here's one possible configuration.

    Boot is always 100 MB, unless you're so pressed for disk space that you need to reduce it further. /var/www is where Web server files go, so you'll want a lot of room there. Swap is usually twice the amount of RAM.

    hda (12 GB)

    - boot 100 MB

    - /var/www 11,000 MB

    - swap 500 (assuming 256 MB of RAM)

    Reserve a fair amount of space for /tmp and /var, which hold files like logs and working files. Putting each of these in its

    own partition means that, for example, a log file that runs out of control won't crash the rest of the system. Reserve a fair

    amount of space for /home. And increase that if you're going to have other people maintaining their own home directories on

    your Web server. The rest goes to the root partition.

    hdb (14 GB)

    - / 5000

    - /tmp 2000

    - /home 3000

    - /var 2000

    2.3 Ethernet configuration

    If you're not using DHCP, you're going to need to configure your network card manually. In the Network Configuration step,select the Edit button to the right of the Network Devices list box. You'll uncheck the “Configure using HDCP” check box, and then enter the IP Address and Netmask for your Web server computer.

    Once back in the Network Configuration step, you'll select the “Set the hostname” option button to “manually”, and enter the hostname for your Web server computer.

    Finally, you'll enter the IP address for your Web server's gateway (often this is an IP associated with the router that the server is connecting to the Internet through), and the IP addresses for the DNS servers your Web server will be using.

    You can verify and modify these settings through the System Settings | Network dialog as shown in Figure 1. You'll need to enter the root password in order to gain access to the dialog.

    Figure 1. The Network Configuration dialog allows you to access and modify your network settings.

    Select the Edit button in the Network Configuration dialog to view or change the IP addresses for the computer, as shown

    in Figure 2.

    Figure 2. The General tab of the Ethernet Device dialog allows you to view and change the IP addresses

    Associated with the computer.

    Select the DNS tab of the Network Configuration dialog, as shown in Figure 3, to modify your hostname as well as your

    DNS settings.

    Figure 3. The DNS tab of the Network Configuration dialog allows you modify the hostname and DNS settings.

    3.4 Firewall and Services

    Use the Firewall Configuration dialog to set up the basic firewall for your server. First, select the “Enable firewall” choice at the top of the dialog. Second, select the 'WWW (HTTP)', 'SSH' and 'Mail (SMTP)' services. Finally, if you're going to use HTTPS, enter the text string 443:tcp into the "Other ports" text box in order to allow HTTPS through on port 443. See Figure 4.

    Figure 4. The appropriate settings for setting up a firewall on your Web server.

    Also note that you'll need the "openssh-server" package for ssh.

    3.5 Package Group Selection

    Having selected the 'server' installation type earlier causes the following package groups to be automatically selected. (The number of packages selected out of the total number of available packages is shown in parens behind each section.)

    text based ineternet (3/7)

    server config tools (9/12)

    web server tools (20/25)

    winfs (2/2)

    admin tools (11/12)

    printing support (1/10)

    Now go into the Web server tools section and add the following packages:

    mod_auth_mysql

    mod_auth_pgsql

    php-mysql

    php-pgsql

    Now, since this is your first Web server, you'll want some extra help. Select the following sections to be installed in

    addition to the server defaults just discussed, and add or remove individual packages in each section as noted.

    X Window System (33/38): No changes

    Gnome (34/40): Add gqview

    Kde (14/15): Add kadmin

    Graphical internet (4/14): Add quanta

    SQL database server (4/6): Add MySQL-server

    System tools (7/22): No changes

    3.6 Log file

    Once you're done with the initial installation, the installation log file is found in /root/install.log.

    4. Get rid of unneeded services

    Open Open System Settings | Server Settings | Services, and make sure that just the following services are running (for both level 3 and 5.)

    acpid

    anacron

    atd

    autofs

    cpuspeed

    crond

    gpm

    httpd

    iptables

    irqbalance

    kudzu

    mdmonitor

    mdmpd

    messagebus

    microcode_ctl

    network

    portmpa

    random

    rawdevices

    readahead

    readahead_early

    rhnsd

    rpcgssd

    rpcidmapd

    rpcsvcgssd

    sgi_fam

    smartd

    sshd

    syslog

    xinetd

    You may choose to turn off xinetd as well.

    5. Test the Web server's default page

    It's time to test your Web server to see if it's actually a Web server or just a computer with grand aspirations. If you have to do

    your testing on the Web server machine itself, open up a browser and enter

    http://localhost/

    into the address bar.

    If you've got access to a different computer - ideally on a separate line - and you've got a separate domain set up on the Internet,

    and pointed to the gateway IP in step 3.3, enter

    http://www.yourdomainname.com

    into the address bar. In both cases, you should see the Apache page, as shown in Figure 5.

    Figure 5. The default Apache page on Fedora Core.

    6. Test the Web server with your own page.

    Create your own index.html file and put it in /var/www/html and run the test (localhost or yourdomain.com) again - you should

    see your own page instead of the Apache test page.

    7. Secure the box by shutting off unneeded services

    Run the commands

    netstat -an | more and lsof -P –i to see what ports are open and what services are accessing them. The only ports that should be open are 22, 80, and, if

    you're interested in HTTPS, 443.

    8. Reconfigure ssh

    Change the setting of

    PermitRootLogin in the/etc/ssh/sshd_config

    CONFIGURING THE SAMBA SERVER

    1. Enable Network Connectivity to the SAMBA Server
    Using the Fedora Network Configuration tool you will need to ensure that the ethernet card is enabled and properly functioning. Get quick access to the tool through this command: system-config-network
    Once in the Network Configuration tool, you should ensure that your ethernet device is enabled. If it is not, select the eth device and then click on the Edit button. This will allow you to input the vital network adapter settings including: statically set IP address, subnet mask, and gateway. You should also select the top checkbox labeled Activate device when computer starts.
    Close and save any changes you've made. The main goal is to ensure you have an ACTIVE and functioning network card on the SAMBA server.
    Restart the network services or simply reboot your SAMBA server. Now try a ping to the server from another PC on the same subnet. At a command prompt, for example, type: ping 192.168.1.1
    The ping should come back good validating your network connection.


    2.Update Firewall Settings
    In most cases the default Firewall setting on the SAMBA server locks out any inbound network requests. I've had a great many people come running to me about this issue. If you're setting up a basic SAMBA server within your business intranet, allow your ethernet connection to be a trusted device so others can get to your SAMBA server and not be bounced by the server's Firewall.
    If you plan to use the SAMBA server outside of your business firewall/intranet you should NOT follow the next step. Instead you allow your local server to receive packets by making changes to your IPTABLES, such as:
    iptables -A INPUT -s 192.168.0.0/255.255.255.0 -j ACCEPT
    The following step is for those using an intranet business server configuration.
    Okay, now to allow your intranet based SAMBA server to properly accept incoming requests, from your Main menu choose System Settings, then Security Level. You can access this also by typing the command:
    system-config-securitylevel
    Please select the box next to the ethernet card you are using for intranet connectivity so that it becomes a TRUSTED DEVICE. Otherwise you have a super secure server that bounces inbound requests. Notice, this selection effects all the items in the Services listing above it, so please be careful in what context you allow a trusted device!
    Press OK when finished.

    3.Enable SMB Services


    Ironically, the SMB daemon and other core services are usually NOT started by default. You will need to change this so that your SMB daemon is now started.
    Using the GUI from the main menu, go to System Settings, then Server Settings, then choose Services. You can also get to this using the command: system-config-services

    While you're looking over this long list of services, please DISABLE things you know for sure you do not need to run on this SAMBA server. For instance apmd, isdn, etc. But also ensure that key services such as SMB are selected and RUNNING. Select SMB and press the Start button. If it is supposedly already running you can press the Restart button to be sure it is indeed running correctly now.
    Now press the Save button to make sure the configuration changes have been saved for future restarts.
    Sometimes using the GUI just does not properly restart the SMB daemon. In such odd cases, I want to suggest you force a manual restart from the command line with this command: /etc/rc.d/init.d/smb restart
    If you keep having startup failures, where for every reboot you need to perform Step 3, you may need to manually configure your start up processes so that SMB will always be in the init.d bootup..


    4.Create Server Users & Directories
    You will need to ensure that people also have a login to the SAMBA server to do their work. Logins should be provided on an as needed basis. Obviously, in most cases the users accessing the SAMBA server will be a subset of the total users on the Windows business network.
    Create user logins with the Gnome User Manager tool in Fedora. You can find this from the main menu by choosing System Settings, then Users & Groups. The command for this is: system-config-users
    Notice this is the first step in creating SAMBA users, which comes later.
    Add as many users as you need and then move on to the next part, which is creating directories (aka. folders) for use.
    This is such an obvious step most people usually forget to think about it before hand. However, it is very helpful to think ahead what directories you will allow access to on the SAMBA Server for business use. In my case the people needing SAMBA server access will be updating webpages. Therefore, I do not need to add any other folders for file sharing or group interaction. Be sure you add any folders in a reasonable and ordered fashion.
    A big TIP for those who are not aware, the permissions settings for your folders are very important


    5.Configure the SAMBA Server
    It's time to configure your SAMBA server to allow others on the intranet to login and use the server from Windows or Linux PCs.
    From the main Fedora menu, choose System Settings, then Server Settings, then Samba. You can also get to this tool by typing the command: system-config-samba
    You are about to make changes to the SAMBA Configuration file called smb.conf. This file is found under /etc/samba. I also want you to be aware that you can edit configuration files with the web interface tool called Samba Web Administration Tool(SWAT) and several others. Now lets move ahead using the Configuration tool using the preloaded Fedora tools. NOTICE that many people begin by tinkering with their .conf file... this is NOT a good idea. First ensure that the basic samba connectivity works and THEN you can tinker with the smb.conf (see troubleshooting below)
    A. Begin by Making Changes to the Server Settings
    Under the Preference menu item choose Server Settings...
    Be sure to include the Windows workgroup name. In the example above the workgroup has been changed to net. Your situation may be different. In many cases naming the workgroup simply workgroup is fine, so long as your Windows PCs connect to this same name.
    Under this same window, click on the Security tab. It comes by default with the appropriate settings for a basic SAMBA Server. The Authentication mode should be User. You would need to change this only if you plan to allow logins based on the Microsoft ADS.
    Press OK to finish making basic changes to the server.
    B. Select SAMBA Users
    Under the Preference menu item choose Samba Users


    In this window you must Add at least one user who will have access to the SAMBA Server. Notice that only user accounts you created in step 4 should be added to this listing.

    Press the Add User button, then from the pull down select a user. Fill out the additional information needed for this SAMBA user. Press OK when finished.
    C. Adding A Shared Folder
    Under the SAMBA Server Configuration window, you must create at least one SAMBA share directory.
    Press the Add button and then the Browse button. Now choose a folder you wish to make available to SAMBA users. Be careful, some folders have permissions settings that do not allow sharing. Now be sure to select the Read/Write option to allow people full access. Don't press OK yet!


    You should see your shared folder appear under the listing as shown in the example above.
    D. Adding Users
    In the same window, select the second tab labeled Access. From here choose the first option labeled Only allow access to specific users and select the users you wish to give access to this specific SAMBA shared folder. Press OK when finished.
    You can repeat steps C and D for each new shared folder.
    Once completed, please choose File from the menu then choose Quit.


    Hopefully this saved all of your settings properly. If you encounter issues with the graphic SAMBA configuration tool, such as it failing to accept your changes, then please read the Troubleshooting Tip 4 located below.

    6.Restart the SAMBA Services
    Now you need to restart all SAMBA services. You can use the process found in Step 3, except press the Restart button or use the word restart instead of the word start.
    I mentioned earlier that sometimes your changes do not get properly picked up. I've installed so many different Fedora SAMBA configurations that I can't recall every reason. This may be a very good time to simply reboot the LINUX/SAMBA Server. Rebooting will ensure everything gets properly started up and all of the configuration changes are included. More importantly, this is likely the last time you will ever restart your SAMBA server again. Some of my FEDORA servers haven't been restarted in years.

    7.Access the SAMBA Server from Windows
    You're now ready to fully utilize your new intranet SAMBA Server for work. On any Windows PC you can access the server by simply going to the main Start menu, choosing Run and typing in the hostname of your SAMBA server. For example: \\linuxserver
    Please notice that in the Windows environment you use different slashes and you need to ensure this syntax.


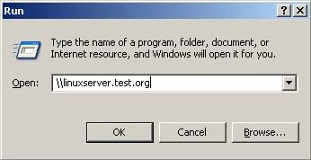
    If this does not work, perhaps if the server is not yet included in your DNS, try accessing the SAMBA Server through its IP address: \\192.168.1.2
    Obviously you need to use an actual hostname or IP address and not my example.
    If all works well you should instantly see a SERVER LOGIN window. Now login using a SAMBA created username.


    You should then instantly see the shared folder as well as the individual user's personal folder that exist on the SAMBA Server.


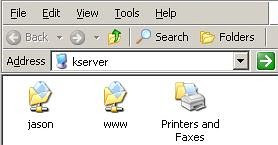
    The samba file server in the windows ‘My Network Places


    8.EDITING THE SMB.CONF FILE
    If you must edit the smb.conf file here are a few pointers:
    1. Find your smb.conf file
    The smb.conf file contains the key elements for configuring your SAMBA server. It is almost always located in the directory /etc/samba and so you get to it with the command: cd /etc/samba
    2. Edit the smb.conf file
    First use this command to make a backup of your file: cp smb.conf smb.conf.backup
    3. Now edit the smb.conf file using your favorite text editor.
    One of the most important lines is this:
    # workgroup = NT-Domain-Name or Workgroup-Name
    workgroup = workgroup
    Be sure that the workgroup matches the Windows workgroup you want this server in. In the example it is set to “workgroup”.
    If you're editing this file to allow for WindowsNT or ADS usernames, be sure next to wins server you specify the correct LINUX server IP address:
    wins server = 192.168.1.2
    The Share Definitions section is MOST VITAL. Under this section you must at least ensure that the username file is mapped correctly. In the basic example I am writing about you will map to the standard SAMBA username file.
    username map = /etc/samba/smbusers
    Notice that I've removed the ; so this parameter is actually used.
    Now test that every change you've made at least passes the parameter test. At the command prompt type:
    testparm
    You should see zero errors.
    4. Don't forget once you edit the smb.conf file you either need to run the command:
    /etc/rc.d/init.d/smb restart
    or you can simply reboot the server. But please do one of these or your changes will not get picked up!


    9.TROUBLESHOOTING TIPS

    1. SAMBA Server is not accessible
    First and foremost try a reboot to the server itself! It is vital you do this before someone talks you into changing configs, playing with your network card settings etc. Just reboot and try again to see if it clears up the issue.
    2. Network Unreachable or Host Unreachable From Linux PCs
    Trying to connect from another Linux PC and nothing happens or "network unreachable" may be as ridiculous as an incorrect SAMBA connection. Make absolutely certain that the connection is typed in exactly as follows (obviously changing the workgroup name to your windows workgroup): smb://WORKGROUP
    On some KDE desktops, attempts failed because the syntax incorrectly tries: smb:/workgroup Those // are quite important!
    3. Failure to Connect from Windows PCs
    Not connecting to the server from Windows PCs may be a result of bad network configuration. Are you absolutely certain you entered the correct network details? Please double check to make sure that you have a proper hostname for the Samba server, that you have a working IP address, and the correct Subnet and Gateway included. In most cases these last two should simply match what your windows PCs have designated.
    4. Changes to the configuration are not being picked up
    The Gnome SAMBA Configuration GUI often encounters errors when trying to update new SAMBA settings. I've seen the GUI tool write a whole lot of garbage into the SAMBA configuration file (smb.conf). For this reason, as I mentioned earlier, you may need to start with a fresh clean smb.conf file and try again, or you may need to manually adjust settings without the GUI.

    5. Can't Share Folder in Home Directory
    First, it's always a good idea NOT to make a Samba share out of directories inside your Home folder for security reasons. Making unique share folders is often the best bet. However, there are times when you need to share a folder and the way to do so is to update your Samba Share's security settings. Under the Samba Configuration, highlight your shared directory and press Properties. Here you can see the "Basic Permissions" list and usually the default is "Read Only." Select the "Read/Write" option and be sure to save your changes by quitting and then restarting the smb daemon. If this doesn't resolve the issue of directory shares, you may have a more fundamental security issue. You need to ensure that the over all Samba security settings under "Preferences", then "System Settings" and then the Security tab are correct.

    10.INTEGRATING WITH MICROSOFT ADS OR NT LOGINS
    Maybe at this point you're in dire need to figure out how to use the SAME exact logins/password for users on the LINUX/SAMBA server as in the rest of your ADS environment. I promised I would avoid the details of this but here are some helpful tips. In the smb.conf file you will need to add the obvious configuration lines for ADS, but also be sure to change this line:
    unix password sync = yes